


Gres tiles have become popular, mainly because of their properties. They are frost-resistant and therefore can be used outside the home. Also, they are perfect for places frequented frequently, because of their high hardness, it is challenging to scratch them. Unfortunately, excellent mechanical properties entail higher purchase and assembly costs.
DIFFERENCES BETWEEN GRES AND CERAMIC PLATES
At first, one could say that there are no vast differences. Both ceramic and porcelain tiles are hard and require proper glueing and sharp tools for their processing. After a closer examination of both these materials, however, we conclude that the differences are quite significant.
The first issue is the material from which the stoneware tiles are made for this purpose, among others finely ground quartz, feldspar and kaolin. The process of making stoneware looks a bit different, which is subjected to the pressure of up to 800 kg/cm² and fired at 1200-1300 °C. Thanks to this, not only high hardness and bending resistance are obtained, but also low water absorption. This makes gres tiles an ideal solution for rooms exposed to moisture, e.g. in the bathroom.
HOW TO CALCULATE THE TILES NEEDED?
Even before buying tiles, you should carefully measure the area of the room. Thanks to this, it will be possible to estimate the costs of both tile purchase and repair crew (if we decide on such a service). For rooms with standard shapes, calculating their area will not be complicated. In the case of walls, please measure the width of each of them, add these values to each other and then multiply by the desired height at which you want to lay the tiles. Determining the floor surface, we increase its length and width. Remember to add approx — 10-15 % to the total area due to possible material losses.
To retrieve dimensions, a simple roll or tape measure is sufficient, but you need to consider their limitations. First of all, it is not always possible to easily access the entire length of the room due to furniture or hanging decorative elements. Also, traditional measures have a limited range, which will be somewhat embarrassing for larger rooms. In such situations, it is worth reaching for newer solutions that are more convenient and much more precise.
Distance meter NIVEL SYSTEM HDM-5
This small device can significantly replace traditional distance measurement methods. The measurement error of +/- 2mm and a maximum operating distance of up to 50 meters are one of the many advantages of this equipment. When laying tiles, its functionality will prove to be particularly practical, because the Nivel System HDM-5 can automatically calculate the area and volume of measured objects. The device is also resistant to dust and moisture, which is usually impossible with traditional measuring equipment.
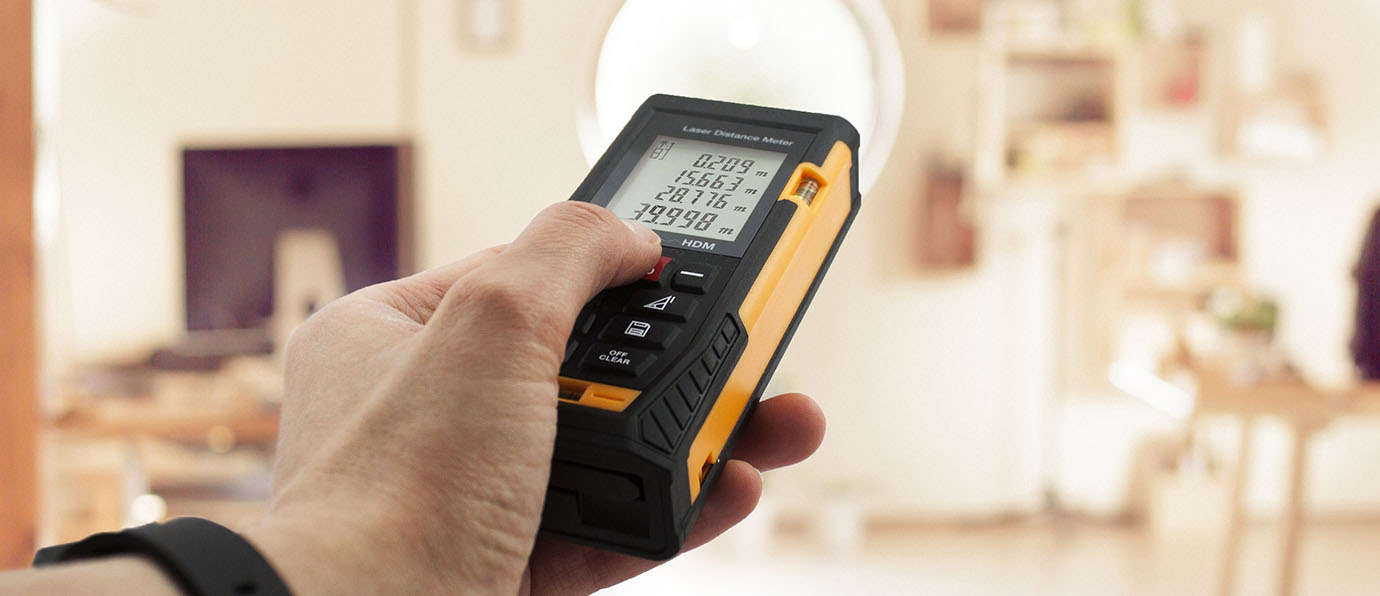
Distance meter
LAYING GRES TILES - BEFORE YOU BEGIN!
Proper preparation of the substrate, tools, glue and the tiles themselves is the key to achieving the intended effect. First of all, the question: "How to glue tiles?" Must be answered: - Take your time! Laying tiles is one of the tasks that require meticulous action with maximum accuracy. Therefore, most people decide on the services of experienced renovation and finishing companies. Before glueing, it is advisable to lay out the tiles "dry" to avoid later mistakes during installation. It is essential to choose the right adhesive mortar. Since stoneware tiles are characterized by low water absorption, mortars with increased adhesion, belonging to the C1T class, should be selected.
Just after removing the tiles from the packaging, it is worth checking them carefully for bulges, damage and discolouration. When laying, you can also mix tiles from different cartons to get a more random tonal distribution. It should also be remembered that most often tiles are produced in several shades compared to the primary colour (e.g. two lighter shades and two darker shades). Information about the tone used should be on the packaging. It is essential to use tiles in one shade only during installation - unless we intentionally decide to do differently.
SUBSTRATE PREPARATION AND INSTALLATION OF TILES
It is imperative to ensure that the substrate is dry, free from dust, grease or old adhesive mortar. It should also be borne in mind to ensure proper adhesion. Falling wall or floor fragments should be forged and properly filled. ATTENTION! Do not use glue to fill unevenness. For this purpose, e.g. putty should be applied. If the surface has been properly cleaned, it must be well primed. Surfaces with high absorption coefficient should be primed twice. Failure to do so may result in tiles cracking or loosening. New concrete floors and plasters must be seasoned. Tiles should be applied on a substrate with a moisture content not exceeding 4%.
PREPARING GLUE FOR TILES
Mixing of the adhesive should take place in the correct proportions, according to the manufacturer's instructions. It happens that there is too much water in the mix, which makes the glue too thin, and it's setting time increases. This will be problematic, especially when laying tiles on the wall. It is recommended to apply the adhesive both to the base and the bottom of the tile. The adhesive mortar must fill the space between the base and the tile thoroughly. It is unacceptable to glue tiles on the so-called cake, i.e. applying the mortar only in the central part of the tile. The excess glue flowing out should be removed regularly. Remember not to soak the tiles in water before laying them. This solution worked several dozen years ago, but now there is no such need and can even seriously harm.
Another essential factor that needs no introduction is the bonding of tiles according to specific reference lines. A traditional spirit level will be necessary for this respect, although much better and more convenient solutions, e.g. laser levels, have been available on the market for a long time. For home use, we recommend the Nivel System FL1 cross laser, available in our store.
CROSlinER NIVEL SYSTEM FL1
This instrument is characterized by accuracy and reliability. The laser beams can be projected in a vertical and horizontal plane. If necessary, it is possible to throw both beams at the same time, which will form a cross. FL1 is perfect for laying tiles on the floor. The laser beams can be directed downwards, making them visible on the floor. The equipment can also be mounted on a tripod, and the high class of dust and water resistance allows the device to be used in adverse conditions - even outdoors.
VACUUM HANDY LAYING DEVICE PROBST FLIEGUAN-HANDY FXH-25
This tool will be perfect for small renovation and finishing companies. The use of a vacuum gripper significantly facilitates the handling and stacking of panels. The maximum load capacity of 25 kg is ideal for heavy and large porcelain stoneware tiles. Thanks to the use of a gripper, the risk of material damage are also reduced, as tile placement is more precise and possible with one hand. The gripper can be connected to a standard industrial vacuum cleaner.

The vacuum gripper makes work much easier
WHAT EQUIPMENT FOR CUTTING TILES?
Cutting tiles, especially stoneware, is undoubtedly a task that requires concentration and proper equipment. It's best to use a professional diamond blade and a power cutter with the option of wet cutting. Manual cutters or angle grinders are also used. Unfortunately, they do not guarantee such functionality and cutting quality as the cutters mentioned above.
TILE SAW HUSQVARNA TS 230 F
This equipment is light and durable. It was equipped with an 800 W single-phase electric motor. Despite its small size, it provides considerable functionality. It is possible to make cuts at an angle of 45 degrees, and a well-thought-out system of folding the tabletop allows it to be easily cleaned. The machine supports discs with a diameter of up to 230 mm, and a foldable stand can be ordered that will increase the comfort of work. We attach the Husqvarna Elite-Cut GS2 diamond blade with a diameter of 200 mm to the cutter.
Tile grouting
Grouting should be started after the adhesive mortar has dried completely. Most often, wait 24 hours. If the room is humid, the waiting time may be extended to 48 hours. Before grouting, it is worth doing the test on a smaller and hardly visible part of the tile, because grouts with intense colour may discolour the surface of the tile.
Apply the well-mixed joint compound with an extensive movement, obliquely about the position of the joints. In order not to scratch the surface, it is worth using a rubber trowel. After partial drying of the mass, we wipe the excess with a damp sponge. Be careful not to wash new joints and not to scratch the surface of the tile. Polished unglazed tiles require prior impregnation before grouting. For grouting tiles in the kitchen or bathroom, it is worth using joints that protect against mould and fungus. The space between floor tiles and the wall is not filled with joint mortar. For this purpose, a sealing compound, e.g. silicone, is most often used.
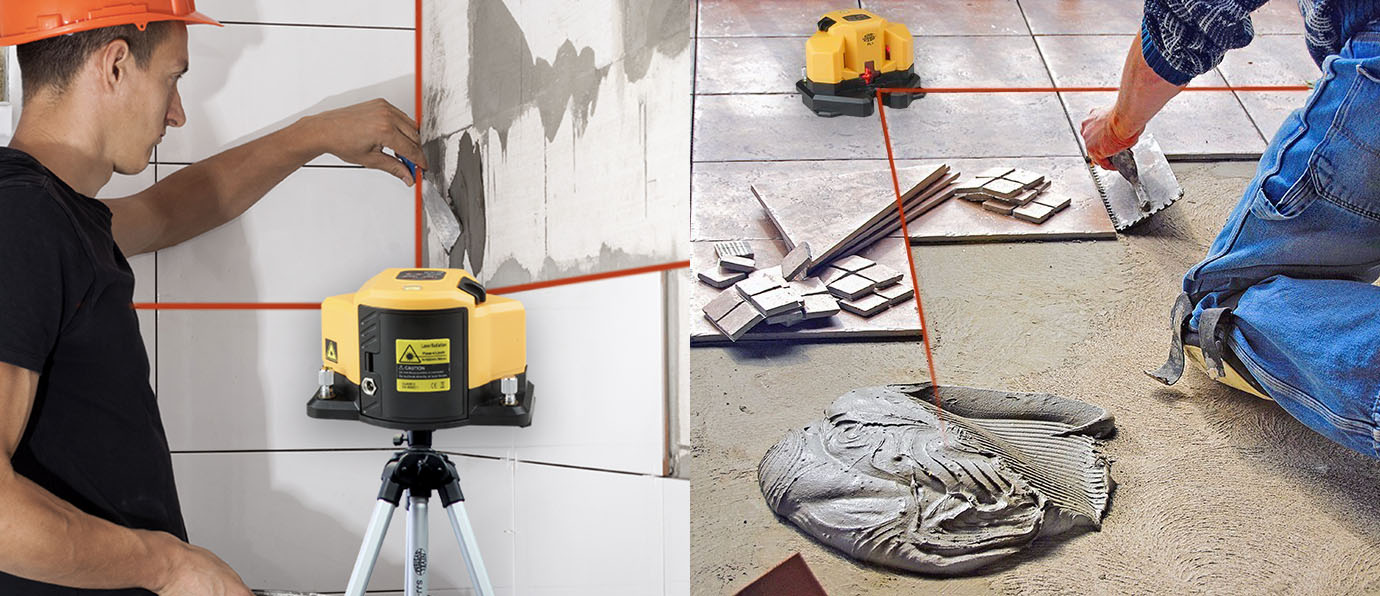
Laying tiles with the Nivel System FL1 cross laser
COMMON MISTAKES WHEN PLACING TILES
A serious problem may occur before laying the tiles. Namely, it is about improper preparation of the substrate. It is necessary to get rid of dust, greasy stains, old adhesive mortars and remember to prime the surface. The next thing is applying the glue. It is recommended to use glue not only on the base but also on the tile. If the adhesive layer is applied too thinly, there is a risk of subsequent loosening of the tiles. An excessively thick and irregular adhesive layer is also not recommended, especially when laying floor tiles. If water gets into places that are not filled with glue, the tiles may break or fall off.
Grouting is also a mistake. Most often, glue needs 24 hours to dry completely. In the case of a thick layer of adhesive and high humidity, this time may be longer. It is safest to withhold jointing for 2-3 days. As in the case of laying floor panels, it is vital to maintain expansion joints that compensate for floor work due to temperature changes. This will be especially important for underfloor heating. Expansion joints should appear when the surface of the heated surface exceeds 40 m2, or one of the sides of the surface is more than 8 meters long. Place the tiles so that their joining (grout) falls in place of the expansion gap. However, the joints are not filled with glue and are used, among other, unique PVC expansion joints. It is also worth adding that glazed porcelain tiles do not require additional impregnation.
SUMMARY
Laying stoneware tiles is undoubtedly not an easy task, but sticking to the basic rules and meticulous operation will allow you to get the expected result. The choice of equipment for this type of work will also be necessary. The use of modern solutions will significantly facilitate and accelerate your progress at work. If you do not know which equipment from our offer will work best for you, please contact us. We will advise you in choosing the best solution so that placing the tiles will not cause you any problem.


